


You can take simple screen shots on your Mac by learning just a few easy keyboard shortcuts. You can grab the whole screen, just a section, or just a window. You can also create a file with the screen shot, or copy it to the clipboard to use in another app.
Video Transcript
Hi, this is Gary with MacMost.com. On this episode let me show you how to take a screenshot with your Mac.
One of the most common questions people have about Macs is how do you take a screenshot. Well, it’s actually quite simple. But I’m not just going to show you how to do it. I’m going to show you how to remember how to do it.
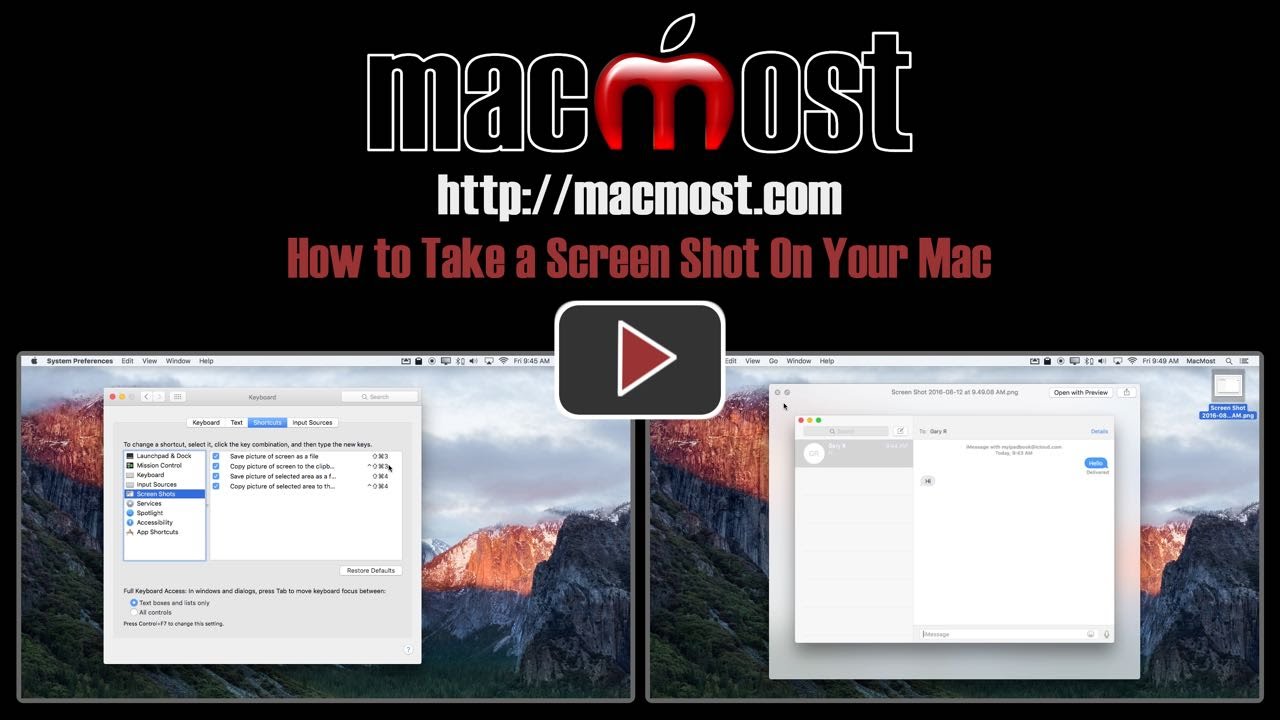
If you go into System Preferences and go into Keyboards and then go to Shortcuts you’ll see here a list of different types of shortcuts. Click on Screen Shots and it shows you the keyboard shortcuts for taking screenshots. Not only is this great as an easy way to remember it but if you’ve changed it or customized it or are using somebody else’s Mac and they’ve changed or customized it, it is an easy way to go and see what it really is.
So you can see here there are actually four different keyboard shortcuts for taking a simple screenshot. You can save the entire picture of screen as a file quick and easy with Shift, Command 3. You can do the same thing but instead of saving it as a file you copy it to the Clipboard with Control and then Shift, Command 3.
Also you can just do a selected area. Instead of 3 you use 4 to do that to save a picture or to copy the picture to the Clipboard.
So let’s go and take a look at those by using an example. Let’s just go and use Messages and say we want to do a capture of what’s in here. It’s a very common thing for people to want to capture the dialogue in Messaging.
I’m going to use Shift, Command and 3. I hear a snapshot sound and I see here files have been created. The reason there is three of them is because I actually have three screens hooked up to my MacPro. But this is the main screen here and you can see if I select it and hit the spacebar to preview it it’s taken a screen grab of what I’ve seen here. So that’s a quick and easy way to do it.
If I were to copy to the Clipboard; so I’m going to add the Control key, Shift Control Command and 3 it seems to do the same thing.
Now I’m going to open up an image editor, let’s say Acorn here. I’m going to do New From Clipboard and you can see it actually creates a new thing from Clipboard. I like this and I use this a lot more because I’m immediately into editing and I haven’t saved anything yet. So I’m not littering my Desktop with all sorts of files. I can now go an edit it and do what I want or Share. I can then save this where I want to rather than having to move that file that’s already there.
Now how about using that area function. If I want to just have an area I’ll do Shift Command 4 and you can see now I get these crosshairs here. It even gives me the pixel location on the screen. So there’s close to zero, zero and there’s the maximum on the bottom right. So now I can click and drag an area. Say I want to just select this area here. Click and drag and release and it saves just that area here. If I preview it you can see I’ve just got that one area. Very handy to do.
Of course, add the Control key to that and it will copy to the Clipboard rather than saving it as a file.
There’s also kind of a hidden function. If I do that same thing. If I do Shift Command 4 and it seems like I’m capturing an area. But before I actually click and drag I just hit the spacebar it changes to this little camera icon and then whatever window I’m over, so here I’m over the Desktop and here I’m over this Messages window, if I just click it it will actually take a picture of this entire window. It even adds the drop shadow to the window.
The nice thing is that if you have overlapping windows it actually will take the window without the piece that is overlapping. So it’s a quick and easy way to get a screenshot of just a single window. Of course, if I do Shift Command Control and 4 it will do the same thing but it won’t save a file. It actually saves it to the Clipboard. Now I can paste it into an image editing app.
So that’s all I’m going to talk about here but there are more advanced options. You can get dozens of different screen capture utilities. You’ll find a lot at the Mac App Store that will allow you to do all sorts of different things and allow you to annotate the screenshots very easily and share them. You can also use the Grab tool which is in your Applications and Utilities folder to do things like timed screen grabs. You can use the QuickTime player to actually record video of your screen to do a video screen grab rather than a still.